Part 1: Component Router Conventions
The new-angular-router coming with Angular 1.3+ now has a name: Component router.
The Component router is aptly named, as it is designed to help break your project into components (such as directives).
Here's a brief overview of some structural changes:
- It routes to components (directives), not templates/controllers
- The routes are setup in a controller/class, not during a config phase
- It uses default conventions to find templates & controller names
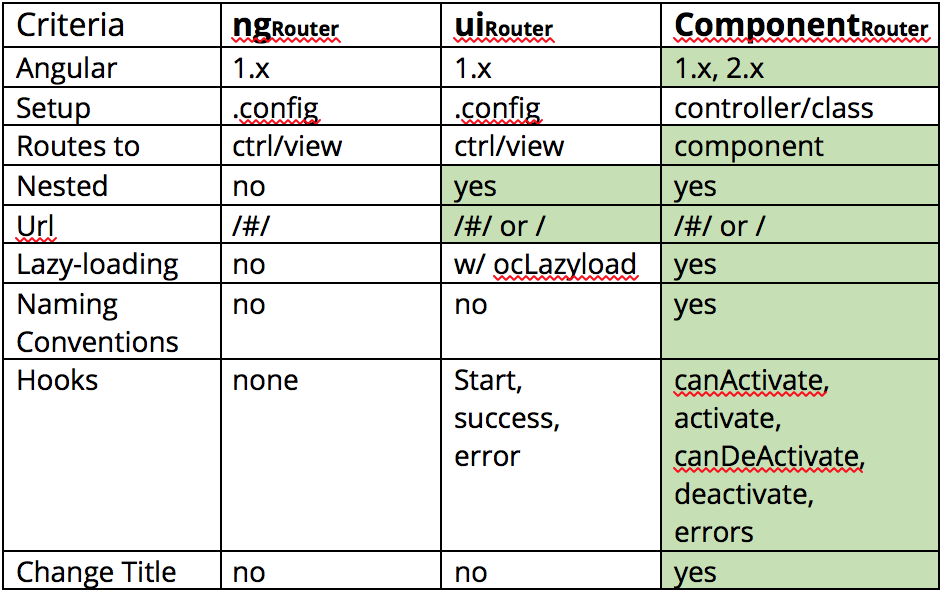
Let's take a look at comparison between the three popular routers in Angular: ngRouter, uiRouter, & the new router.
In this post, we'll look how naming using the Component router with naming conventions can help save you a lot of code.
Conventions
Conventions mean less code. But the magic behind the scenes, that is, the default template mapping and controller naming, can initially come with a lot of confusion.
Let's make a comparison with ui-router to see the repetition Component router is trying to avoid.
ui-Router Example
The popular ui-router is based on states.
  $stateProvider
      .state('abc', {
        url: '/abc',
        templateUrl: 'app/templates/abc.html',
        controller: 'AbcCtrl as vm'
      });
But not DRY enough (Don't Repeat Yourself). This method uses too much chalk.
Component Router Example
Component router comes with built in defaults of how to structure and find your code.
The router defaults assume where the template is located and what the controller will be named.
$router.config([{
      path: '/abc',
      component: 'abc'
}]);
Component router makes the following assumptions based on the component name.
- templateUrl: '/components/abc/abc.html',
- controller name: 'AbcController'
- controllerAs: 'abc'
If you're using compound names, Component router uses snake-case for templates & camelCase for scripts.
$router.config([{
      path: '/defGhi',
      component: 'defGhi'
}]);
- templateUrl: '/components/def-ghi/def-ghi.html'
- controller name: 'DefGhiController'
- controllerAs: 'defGhi'
To keep things easy, just organize your components in the components folder by a snake-cased name. Everybody's happy.
Not happy? If you're not going to let a router tell you how to organize your code, read on. Otherwise, you can leave it at that.
Editing Conventions
These conventions can be edited to your own liking use the $componentLoaderProvider. It's a provider, so run it in the .config() stage.
Change Controller Name
Perhaps you like to name your controllers. You can use the $componentLoaderProvider.setCtrlNameMapping function which takes the component name and returns the new default controller name.
Controller: CapitalizedCtrl
.config(function($componentLoaderProvider) {
      $componentLoaderProvider.setCtrlNameMapping(function (name) {
            // where name is the component name
            var capitalized = name.charAt(0).toUpperCase() + name.slice(1);
            return capitalized + 'Ctrl';
      });
}
The path to your templates can be changed using the $componentLoaderProvider.setTemplateMapping function which takes the component name and returns a path to the default template.
Template: states/component-name.html
.config(function($componentLoaderProvider) {
      $componentLoaderProvider.setTemplateMapping(function(name) {
            var snakeCased = name.match(/[A-Z]*[^A-Z]+/g).join('-');
            return '/states/' snakeCased + '.html';
  });
}
Conclusion
The Component router keeps your code DRY, forcing you to design your app in components, maximizing your use of directives, and using common conventions. It can be frustrating to get started with the Component Router without knowing the defaults, but personally, I've grown to appreciate it.
In part 2 we'll look into using Component router's lifecycle hooks to work some magic, as well as how to take advantage of using ES6 class inheritance.